My Raspberry Pi House Number
At some point over the last three years I had decided to make an LED matrix display number for my house. I think my reasoning was something like: “what if I can’t find a font I like? Wait! I can just make a screen do this”. In the interim my house used a simple sheet of paper with the number printed on it. Cost effective! All that started to change in November 2018 when the Raspberry Pi 3a+ was released.
What a deal! 25 bucks for a pretty slick tiny computer. Since I had no idea what I was really doing, I opted to order the rest of what I needed from Adafruit. They sold a hat for their dot matrix displays, which really made the entire process of getting the screen up and running pretty simple. The downside to Adafruit would be the cost. Their stuff is not cheap. After a couple weeks all my pieces arrived and I got to work. I installed Raspbian and downloaded and built the recommended library for driving the display. So far all pretty painless.
However it wouldn’t be a DIY project if there wasn’t something that went wrong. Turns out the Raspberry Pi 3a+ didn’t actually have support yet in the library. In the past, the library had used the total size of memory on the Pi to determine the model you were running. The physical address of the pins moved from the original Raspberry Pi, which had them located at 0x20200000, to 0x3F200000 in Raspberry Pi 2 and newer. Now, as I mentioned, the library was using the amount of ram to determine the model you were using. Turns out the Raspberry Pi 3a+ only has 512mb of ram, the same as the original Raspberry Pi. Without tweaking the source code, the library would crash the Pi. I submitted a PR that used the cpuinfo details instead, however the maintainers of the library went with a different fix.
Alright! So now my little display can properly run a few demos… but wait a minute the first row of the display is missing the reds! Sadly, I don’t have the pictures of this anymore, but the Adafruit support thread is still kicking around. Basically I found that the hat was shorting out one of the pins on the USB enclosure. I just took a piece of rubber and covered the enclosure, but again, nothing is supposed to go smoothly, right?
So I had the demos running perfectly on my display, and it was time to get started on the actual coding. I had originally planned to use the NodeJS bindings that someone had developed for hzeller’s library, but I found that didn’t want to run on newer versions of Node. Sadly the authors didn’t opt to use Node’s N-API, which means that even small V8 changes can completely cripple the library. This started me down the Node addon rabbit hole, but ultimately I gave up on that route. Now, after having a bit more experience writing a Node addon, I think I could have been more successful, but perhaps that is a project for another day.
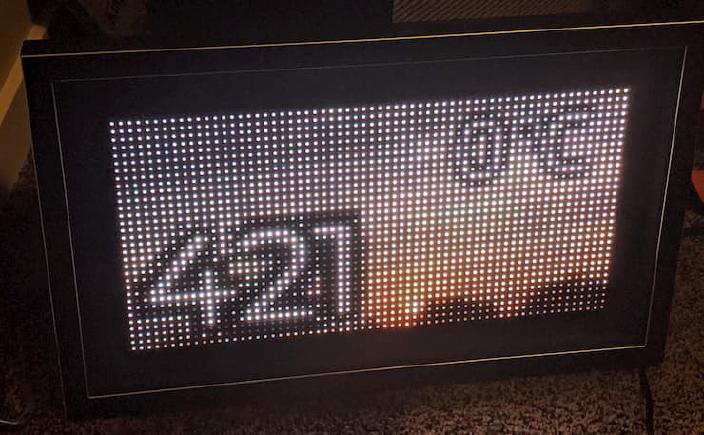
So NodeJS was out and Python 3 was in. Using Python’s Pillow library I was able to get an animated GIF playing on the screen within minutes. A little bit longer and I had my house number rendering on top of the video. At this point the project sat under my desk until about a year later, December 2019. I still need to house the screen and Pi, and noticed Michaels was running a 50% off deal on custom frames. So I opted to take the lazy way out and have them build the enclosure for me. It wasn’t cheap, but I think it came out pretty well.
I still had my old basic code, just running an animated GIF and layering my house number overtop. I revisited this and added a few different features. Previously, my code was completely synchronous, and any change to the image would cause the rendering to stop momentarily. To get around this I opted for an event loop using asyncio.
async def animate_loop(matrix):
   buffer = matrix.CreateFrameCanvas()

   # the first iteration waits on build sequence
   seq = await build_sequence()
   sentry.logging.debug("Setup initial scheduled build")
   asyncio.ensure_future(scheduled_build_cb(), loop=loop)

   # begin the render loop, can manual exit
   while True:
       try:
           seq = queue.get_nowait()
       except asyncio.QueueEmpty:
           pass

       for image in seq.sequence:
           buffer.SetImage(image)
           buffer = matrix.SwapOnVSync(buffer)
           await asyncio.sleep(seq.frame_duration)
Since having one or two images is kind of boring, I opted to have the screen either show a GIF based on the current weather, or the current day if it was a holiday. For example, on a regular sunny day we would get a sun or a nice clear sky playing on the screen. But if it was a very important holiday, like say March 10th (MAR10 day), we get a bunch of Mario GIFs.
async def build_sequence():
   holiday_image = holiday.get_holiday_image(date.today())
   weather_info = None

   try:
       weather_info = await weather.get_weather()
   except Exception as e:
       sentry.capture_exception(e)

   image_path = "image/test.gif"  # default seq

   if (holiday_image is not None):
       image_path = holiday_image
   elif (weather_info is not None):
       image_path = weather_info.weather_image
   else:
       sentry.logging.warn("Weather is unavailable")

   seq = ms.MatrixSequence(image_path)
   if seq.sequence is None:
       sentry.capture_message("Gif with empty sequence is scheduled: " + image_path)

   seq = ms.add_house_number(seq)

   if (weather_info is not None):
       seq = ms.add_weather(weather_info.temperature, seq)

   return seq
For the holiday checks I used the holidays library, and defined my own set of them. Each holiday has a specific set of curated GIFs that should look okay on the low resolution display. For weather details I opted for Weather Stack. They offer 1000 free requests per month, and have data available for my town, which isn’t something all services have. I again created a curated set of GIFs to match the weather based on the weather codes returned by the API. I also decided to add the current weather to the display.
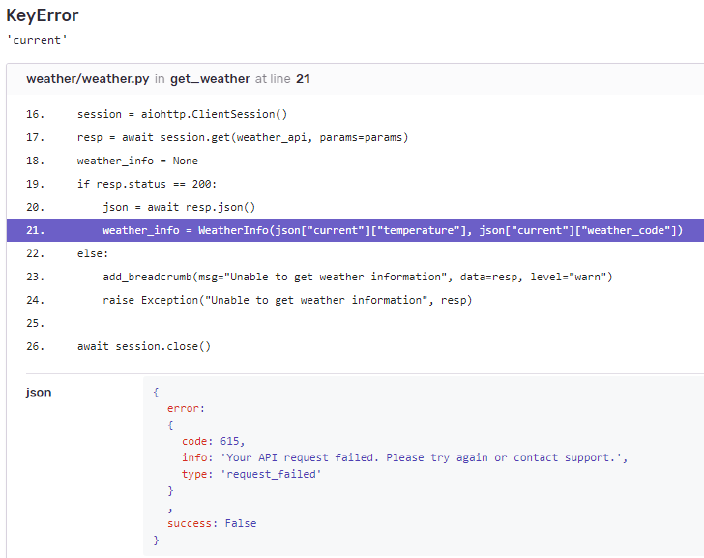
The last bit of work was to get the display to update and change images every hour. Originally I just slept the build callback for an hour, but found that scheduling it on the hour was much more convenient. Now every hour a new GIF will start playing and the weather will be updated… unless something goes wrong. I had been wanting to experiment with error logging software for a while, and figured I would just give it a go with this project. I set up a project on Sentry.io and everything pretty much worked out of the box. It was really useful in helping me debug an issue I had where I didn’t read the Weather Stack API documentation properly.
At this point the project is 99% complete. I still need to mount the Pi inside the frame a bit better, and actually hang up the number. Right now it is just sitting on a window sill and not properly hanging, but it is still completely visible and works just fine for now. Let’s be honest, it just wouldn’t be the same if I actually finished something.